
Remote Procedure Calls (RPCs) are a core part of multiplayer programming in Godot. They allow nodes to call functions across the network as if they were local. Whether from a client to the server, or from the server to clients. Understanding how RPCs work is essential for building responsive and synchronized multiplayer games.
In this guide, we’ll break down the different types of RPCs, how to use them in Godot, and how they behave in client-server architecture.
By the end, you’ll be able to confidently implement basic multiplayer chat functionality using Godot’s multiplayer API.
Prerequisites
We recommend you have a strong understanding of Godot, the editor, and GDScript to follow this guide effectively.
Project Files
This guide covers the basics of RPCs in Godot. We frame this concept around the example of a simple peer to peer game chat server.
You do not need the project files to follow this guide but it will improve your understanding of the guide and topics we cover.
What is an RPC?
An RPC, or Remote Procedure Call, is a way to invoke a function on a remote machine over the network. Instead of just calling a function locally, RPCs let you tell another machine (like the server or another client) to execute a specific function with parameters.
This concept is crucial in multiplayer games, where different devices need to stay in sync. For example, when a player moves, that action needs to be sent to other clients. RPCs make this possible.
In Godot, RPCs are handled automatically through the networking system, using high-level multiplayer APIs. You define which functions can be called remotely using keywords like @rpc, and decide the direction and scope of the call.
RPCs are built on this system and support the following directions:
- Authority to a specific client
- Authority to all clients
- Client to authority
RPCs in Godot
Godot has an powerful RPC system built into their multiplayer framework. Functions are given the @rpc “annotation” which allows the engine to handle all of the complex low level networking for you behind the scenes.
This annotation has four different parameters.
- Mode
- Sync
- Transfer Mode
- Transfer Channel
These parameters can be in any order but the Transfer Channel must be the last!
Mode
The parameter “mode” is used to control which type of peer (connection) can call this function over the network.
There are two types of available modes, “authority” and “any_peer”.
“authority” is used when your function should only be called from the authority and not from any other peer.
This is mostly used for sending data from the server to the clients without risk of cheating or other data manipulation.
“any_peer”
“any_peer” as the name implies, allows this function to be called by any peer.
“any_peer” is usually implemented when communicating information from the local client to the authority.
This data can be input keys or data like their player name.
Sync
The parameter “sync” is used to control if the peer who called the function should actually run the code inside the function as well as the intended receiver.
There are two types of available sync, “call_remote” and “call_local”.
“call_remote”
“call_remote” is chosen when you do not want the peer to run this function locally.
For example you usually would not need the server (authority) to run user interface related code if they are a dedicated server.
In this case you would use “call_remote” as only the receiver needs to run that code.
“call_local”
The opposite is “call_local” this makes the local peer run the code contained in the function as well as the receiving peer.
The most used example of “call_local” is when your server is a player.
This can happen when you want a player to host a game session and other players connect to it without a dedicated server.
You want your server (authority) to also run the gameplay and visual related functions too.
Transfer Mode
The parameter “transfer_mode” has three different options, “unreliable”, “unreliable_ordered”, and “reliable”.
“unreliable”
This is the most common transfer mode for movement or consistent data to peers.
“unreliable” remote procedure calls do not ensure that they are delivered in the right order or even at all. They could be lost or dropped by the connection!
A great example stated before is movement. As the player moves around their position is constantly changing.
When we receive the position from the authority we don’t care that the order they were sent in is maintained.
This data would be sent many times per second so ensuring order and reliably delivering each and every message to the client would likely cause network congestion!
If the data you are sending is not that important or is resent frequently then “unreliable” is the best choice of transfer_mode.
“unreliable_ordered”
“unreliable_ordered” is similar to before where the rpc is not guaranteed to be delivered but as the name suggests, the order of the packets are maintained.
We do not recommend you use this transfer_mode unless you have a really specific reason to use it. If used incorrectly it could cause packet loss for your project!
“reliable”
The last transfer_mode is “reliable”. This is the most common transfer_mode for your RPCs as Godot will ensure that your RPC will reach it’s destination!
The “reliable” transfer_mode is the most useful for maintaining your game state across all peers.
For example when your score reaches 100 you send an RPC to all connected peers triggering the game to end and the scoreboard to show on the screen.
If your game over event was “unreliable” and happened to be dropped by a congested connection, the player would not trigger this code and thus would be out of sync with the other players.
“reliable” will keep resending this message until the player acknowledges that they have received the RPC.
The downside of using “reliable” is that sending too many “reliable” RPCs across the network too fast causes network congestion that affects all other events in your multiplayer project.
This can lead to a disconnection of players as their connection is completely saturated!
Transfer Channel
Transfer channel is a more advanced parameter that is not required in your RPC. If the transfer channel parameter is not set, the engine automatically set’s it to 0.
Transfer channel is the index of the channel that you want to send your RPC through.
If your project has quite complex networking needs, you can use different transfer channels to “split” this across the network.
This can fix some issues related to congestion of a single channel from sending too many RPCs down the same channel in a short time.
We recommend to leave the transfer channel empty as the engine handles this default well for most projects!
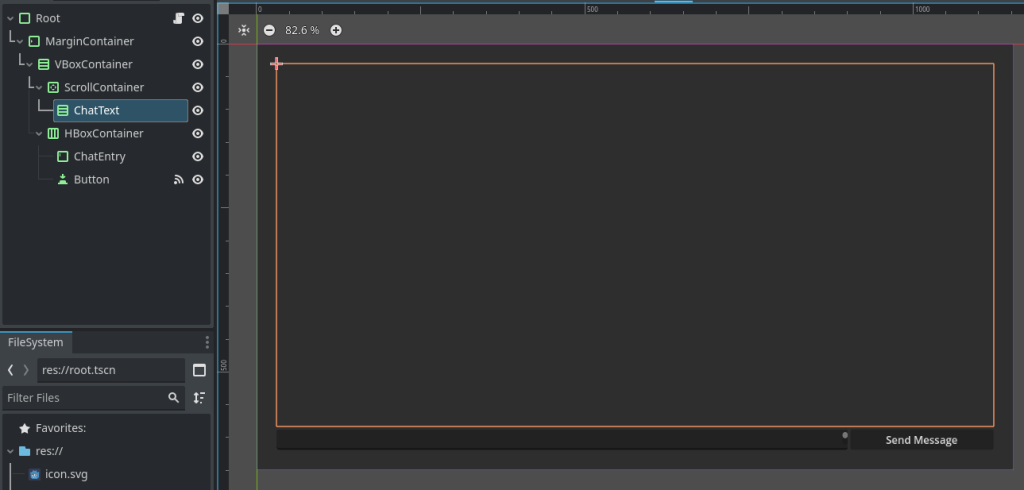
Example Chat Interface
For this guide we are creating basic chat functionality using RPCs. If you want to recreate this functionality, create a basic Panel Container and fill it with the following nodes.
RPC Directions
Client to Authority
In most multiplayer games, clients need to request actions from the server. Since only the server can modify the game state directly, clients must ask permission first.
This is where Client to Authority RPCs come in.
For our chat system example, Client to Authority means the “client” or “player” is sending their chat message to the “authority” which in this case is the server host.
We first make a new function for the local player to run to send their String message to the server.

We then add our @rpc annotation with the “any_peer” mode as we want any client to send their chat message to the authority.
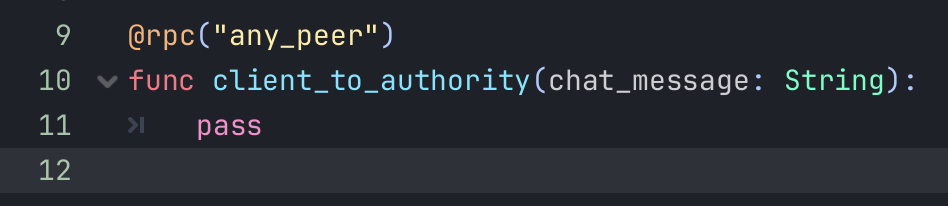
And we set our sync to “call_local” as we want our local peer to run this code. This means that if the authority or server host is a player and not a dedicated server, they also can interact with the chat correctly.

We lastly add the transfer_mode to “reliable” as we do not want our chat message to be lost.

This function can be called on the client and sent to the server using the following code. We are connecting this to our button pressed signal function.

Instead of calling the function with braces (client_to_authority()) we use the .rpc_id() function on the callable to tell the engine that this is a network function.
We use the rpc_id function with the network id of 1 which is the authority. We then also pass through our chat text input as a parameter.
Always validate data on the server when using this type of RPC. Never trust client inputs blindly.
Authority to All Clients
This type of RPC is for when the authority needs to notify every client about something such as spawning an enemy, playing a sound, or syncing an object’s position.
For our chat example we will be using the Authority to All Clients to send our chat messages from the player. This builds upon the previous function and send the input text to all connected clients.
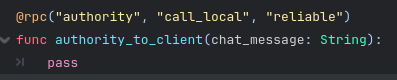
First we make a new function similar to client_to_authority.

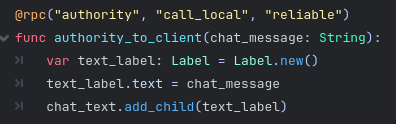
Then we add “authority” to ensure that only the server authority can run this function, “call_local” to ensure our server host player can also use this function, and finally “reliable” to make sure our chat messages are not lost in transit.
We then create a new label, set the label text to our chat_message function parameter. This is then added as a child to our chat_text vertical box. This function adds the text that our player send to the screen.
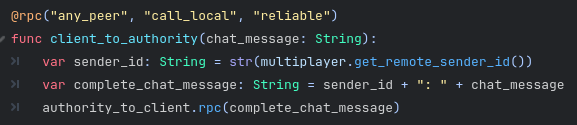
Now we need to improve our client_to_authority function to get the ID of our connected player and then add it to the chat message. This makes it so other players can then see who has spoken. This can be changed out for a username or other identifier.
We then lastly call our authority_to_client function with the .rpc() function. .rpc() sends this rpc to all connected players as we did not specify a peer ID.
Authority to Client
This type of RPC allows the authority (typically the server) to send a function call to a specific client.
Use this when only one client should receive the message from the authority. For example we are sending a chat message from the authority to a specific player.
This would be useful for a situation where you want one player to direct message another!
For this example we are sending the player a message when they first join the server. No other players receive this message as we are sending it specifically to their client via RPC!
We first connect the peer_connected signal to a new function. This function is called anytime a new player joins our server.
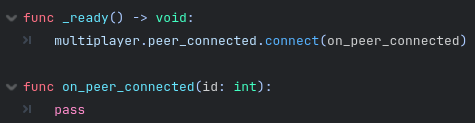
We then check if we are the server and if so then send an authority_to_client function RPC to the newly joined client ID! We then send the welcome message as an argument to the RPC.
To send an RPC to a specific player you must keep track of this peer ID in association to some form of simple identification such as a username. This is usually done using a Dictionary!

Demonstration
Now that are functions are complete and hooked up to our example UI, we can now test the chat example functionality!
In this example the bottom right window is the SERVER and the other windows are all CLIENTS connected using the multiplayer peer system.
In the video clip below, you can see each player typing and other players seeing the messages that have been sent. You can also see the multiplayer ID associated with the message which allows users to be identified by their messages.
Project Files
Conclusion
You now understand how to use RPCs in Godot and how each Authority to Client, Authority to All Clients, and Client to Authority types play a unique role in multiplayer programming.
RPCs let you define clear boundaries and responsibilities in your game’s networking structure. They help synchronize player actions, world changes, and events across machines while keeping control centralized.
As with all multiplayer systems, test often, validate data carefully, and keep your authority model consistent.
Well done on reaching this point! Understanding RPCs is a major milestone in your multiplayer development journey.
Leave a Reply